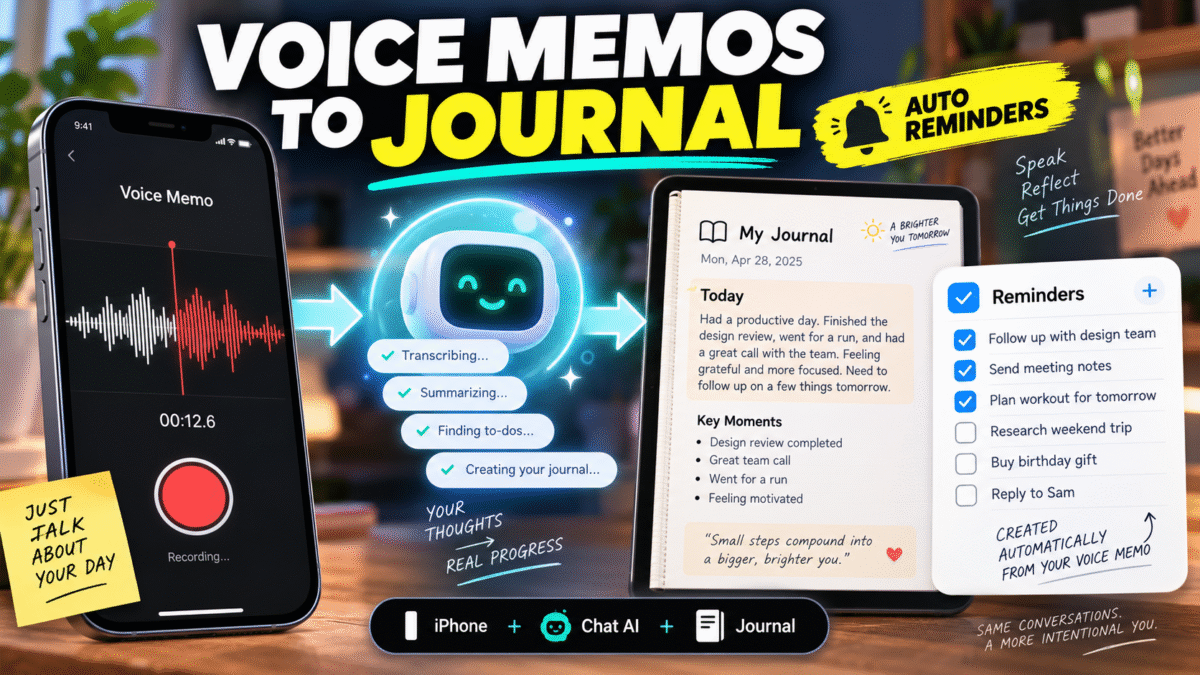
A Simple Voice Diary Using iPhone, ChatGPT, Apple Journal and Reminders
I’ve been experimenting with a very simple way of keeping a daily diary without actually sitting down and writing one.
Instead, I just talk.
During the day I record little voice memos on my iPhone whenever something happens that I want to remember.
It might be something I’ve done, somebody I’ve met, an idea for a video, something I need to follow up, or simply something that made me laugh.
At the end of the day I turn those recordings into one organised diary entry using transcription, ChatGPT and an Apple Shortcut.
The clever bit is that anything I actually need to do afterwards is also automatically added to Apple Reminders.
This is exactly how I set it up.
Step 1 — Record Voice Memos During the Day
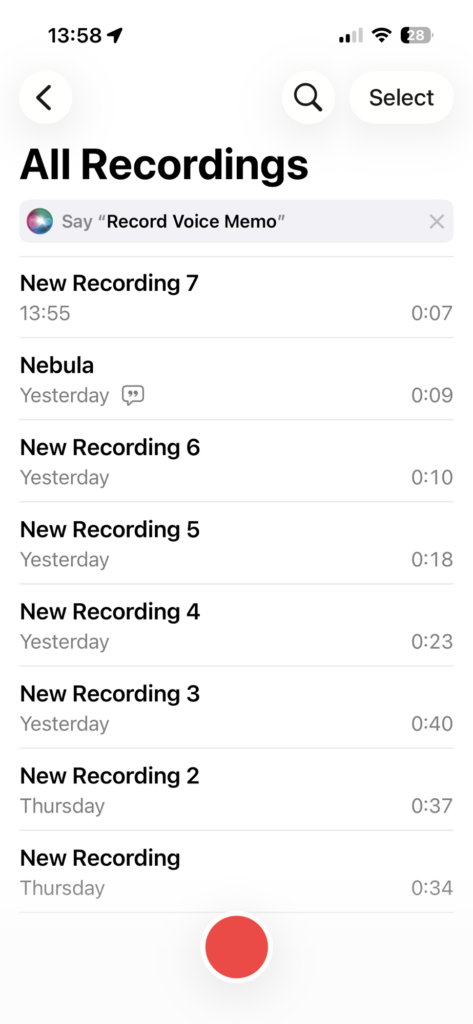
I use the standard Voice Memos app on the iPhone.
I have an iPhone 15 and I have assigned the Action Button to Voice Memos.
That means whenever I want to remember something, I can simply press the Action Button and start talking.
There’s no need to write anything down.
I might record ten seconds or several minutes.
The important thing is that I don’t worry about organising it while I’m recording.
I just say whatever I want to remember.
Step 2 — Transcribe the Recordings
For long form and importance transcripts  I’m using TurboScribe to transcribe my recordings.
The free version allows a limited number of transcriptions each day, which is more than enough for the way I’m using it.
On a daily basis, I just create a transcribed voice note in Apple notes using a special shortcut.
The first half of the Shortcuts reads all the selected voice memos and transcribe them. (See below)
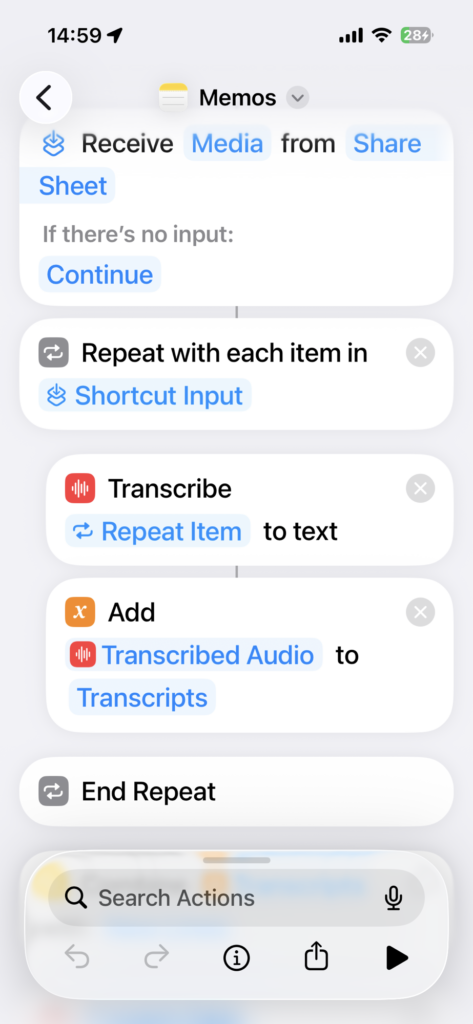
Now you’ve got all the recordings transcribed into their own Little file. Now we need to combine them into one file with yesterday‘s date as the first line to send to ChatGPT.
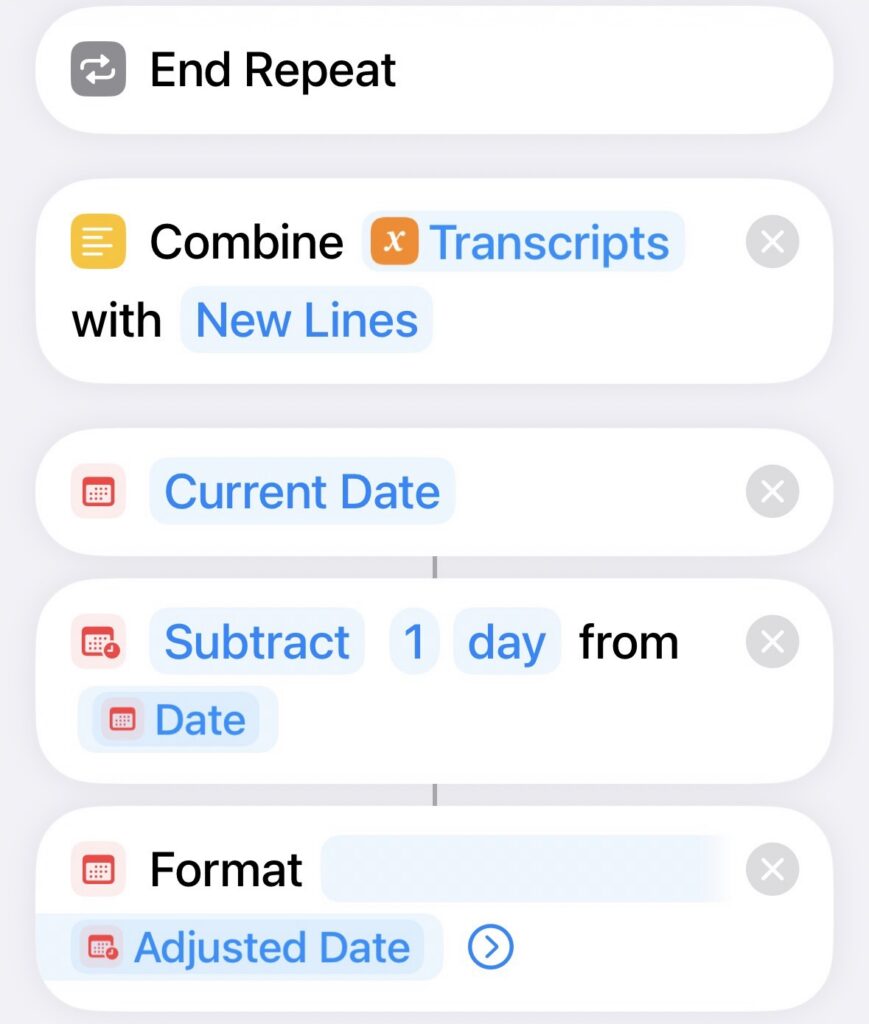
We do this by creating a temporary note in the memos folder of the Apple Notes app.
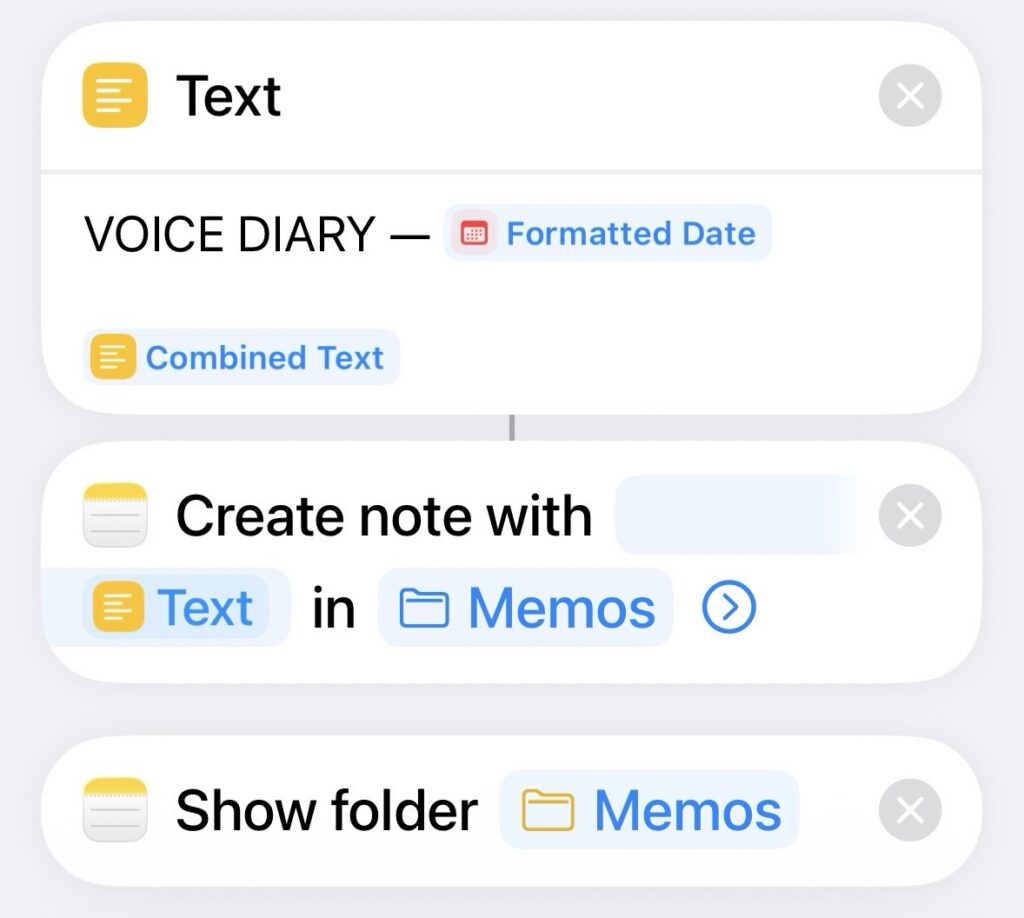
Once the audio has been transcribed, I copy the transcription and send it to ChatGPT.
Open the note and share it with ChatGPT or open the transcript from Turbo scribe and share that with ChatGPT.
It doesn’t matter if the transcription isn’t perfect.
ChatGPT can normally work out obvious transcription errors from the context.
Step 3 — Give the Transcript to ChatGPT
I paste the transcription into ChatGPT and ask it to turn it into my Voice Diary.
Rather than simply reproducing everything word for word, ChatGPT organises it into useful sections.
For example:
Ideas
Things that happened
People I met
Things I want to remember
Follow-up actions
The important part is the format.
I have now asked ChatGPT to remember exactly how my Voice Diary should be formatted.
Step 4 — The Special Markdown Format
ChatGPT gives me the diary as raw Markdown inside a code block.
I deliberately don’t use normal Markdown bullet points because I found that Apple’s conversion to Rich Text could sometimes produce duplicate bullets.
Instead, normal diary information is written as headings and paragraphs.
There is another little trick.
Apple’s Make Rich Text from Markdown Shortcut action was removing some of my empty lines.
To get around that, ChatGPT inserts this between sections:
That is a non-breaking space.
It appears as an empty line when the Markdown is converted, but because technically there is a character on the line, Apple doesn’t throw it away.
That solved the spacing problem.
Step 5 — Action Items Get a Special Checkbox
This is where it gets particularly useful.
Whenever ChatGPT identifies something that I actually need to do, it puts this character at the beginning of the line:
☐
For example:
☐ Wait for a reply from the company.
☐ Add a link to my standard YouTube description.
☐ Try recording some interviews on Tuesday afternoon.
These are ordinary text characters in the Journal entry.
But my Shortcut also looks for them.
Anything beginning with ☐ automatically becomes an Apple Reminder.
Building the Apple Shortcut
The next part happens entirely in Apple’s Shortcuts app.
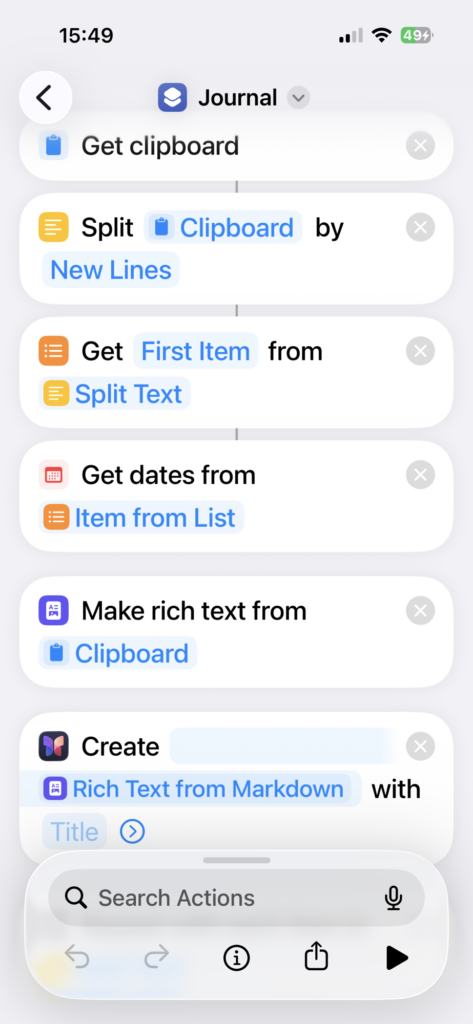
My Shortcut takes the Markdown copied from ChatGPT and does two jobs.
It creates the complete formatted diary entry in Apple Journal.
It also finds the follow-up items and adds them individually to Apple Reminders.
Part 1 — Get the Diary From the Clipboard
The first action in my Shortcut is:
Get Clipboard
After ChatGPT creates my diary, I simply copy the Markdown.
The Shortcut then takes whatever is currently on the clipboard.
Part 2 — Split the Diary Into Individual Lines
Next I use:
Split Text
I split the clipboard using:
New Lines
This gives the Shortcut access to every individual line in the diary.
We need this later when we look for the ☐ action items.
Part 3 — Extract the Date
My Voice Diary starts with a heading containing the date.
For example:
# Voice Diary — 04/09/2026
My Shortcut extracts the date from the diary and converts it into a real date that Apple Journal understands.
I then format that date so the Journal entry is created on the correct day.
This is particularly useful if I’m processing yesterday’s diary the following morning.
The Journal entry still goes against the date that the diary actually belongs to.
[IMAGE: Shortcut actions showing the date extraction and Format Date actions]
Part 4 — Convert Markdown to Rich Text
Next I use the Shortcut action:
Make Rich Text from Markdown
This converts things such as:
# Heading
## Subheading
**Bold text**
into properly formatted Rich Text.
The lines give me the extra spacing between paragraphs.
Part 5 — Create the Apple Journal Entry
The next action creates a new entry in Apple Journal.
The Rich Text becomes the body of the Journal entry.
The date extracted earlier becomes the Journal date.
So by this stage, the entire day’s diary has been created automatically.
[IMAGE: Apple Journal showing the finished Voice Diary]
Automatically Creating Reminders
Originally, this is where my Shortcut finished.
Then I realised something.
ChatGPT was already identifying all the things I needed to follow up.
Why not automatically turn those into actual Reminders?
So we added one more section to the Shortcut.
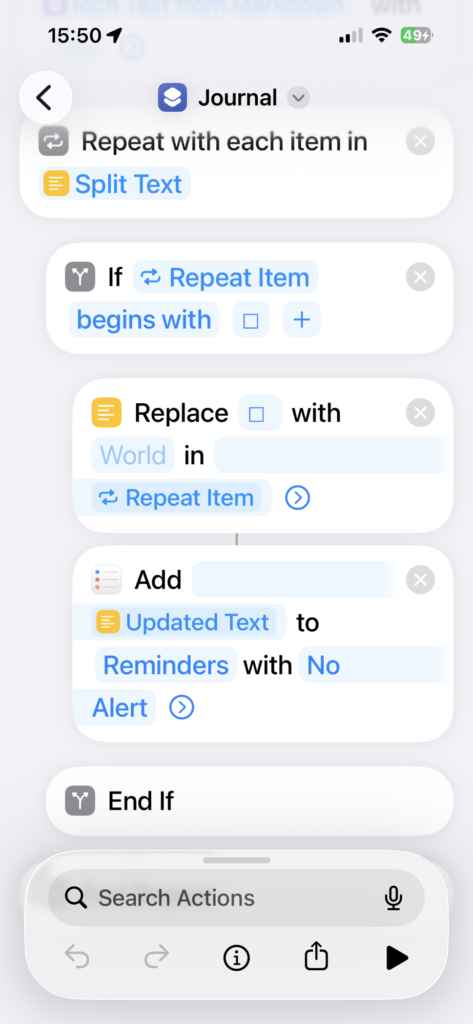
Step 6 — Repeat Through Every Line
Underneath the Journal action I added:
Repeat with Each
The input for this is the Split Text created earlier.
That means the Shortcut now goes through the diary one line at a time.
Step 7 — Look for the Checkbox
Inside the Repeat action I added an:
If
The condition is:
If Repeat Item begins with ☐
This means normal diary text is completely ignored.
Only genuine action items are processed.
This is why I only use the ☐ character for things that I genuinely want added to Reminders.
Step 8 — Remove the Checkbox
Inside the If section I use:
Replace Text
It replaces:
☐
with nothing.
So this:
☐ Wait for the PromptSmart reply.
becomes:
Wait for the PromptSmart reply.
The result of this action is called Updated Text.
Step 9 — Add It to Apple Reminders
Immediately underneath Replace Text I added:
Add Reminder
The title of the Reminder is:
Updated Text
I simply use my normal Reminders list because that’s where I keep everyday things that I need to remember.
The Shortcut then continues checking the rest of the diary.
Every line beginning with ☐ becomes its own Reminder.
What Happens When I Run It
My complete workflow is now extremely simple.
During the day I talk into Voice Memos.
I transcribe the recordings.
I paste the transcription into ChatGPT.
ChatGPT organises everything into my Voice Diary.
I copy the Markdown.
I run my Shortcut.
And that’s it.
The full diary appears in Apple Journal.
Anything I need to do appears separately in Apple Reminders.
An Example
Part of my diary might look like this:
## Things to Follow Up
☐ Wait for the reply from PromptSmart.
☐ Cancel the duplicate subscription.
☐ Add the Only Giving link to my standard YouTube description.
The Journal keeps all of that as part of the permanent diary.
But the Shortcut also creates three separate Reminders:
Wait for the reply from PromptSmart.
Cancel the duplicate subscription.
Add the Only Giving link to my standard YouTube description.
I can then tick those off normally in the Reminders app.
Journal for Memories — Reminders for Actions
This is the part of the system that I particularly like.
I don’t want my Journal to become a task manager.
The Journal is the permanent record of what happened, what I was thinking and what I intended to do.
Apple Reminders is where the jobs actually get done.
The same Voice Diary creates both.
Why I Like This System
There is virtually no friction.
I don’t have to remember everything at the end of the day.
I don’t have to sit down and write a diary.
I don’t have to manually create a list of jobs from my notes.
I simply talk whenever something occurs to me.
The technology does the organisation afterwards.
And because the final result goes into Apple Journal, I’ve still got a proper chronological record that I can look back on months or years later.
For me, that’s the difference between saying I’m going to keep a diary and actually keeping one.